I see this happen all the time. Developers often focus on building a great Shopify app, which is very good. But they expect installation after hitting the publish button. Unfortunately, installs don’t come. Not because the app is bad, but because of the presentation of the Shopify app.
I believe Shopify app store optimization is more important than what you have built. Because merchants will never see your app’s feature or value if you are invisible to them.
Even if you spend thousands of dollars on Shopify App Store ads or external marketing channels, your listing won’t have enough strength to convert them. That’s why the app listing page optimization is crucial.
When your listing is well optimized, you will get more visibility, more clicks, and more installs. Merchants will understand your value in seconds.
In this guide, I would like to give you a clear roadmap to optimize every part of your app listing. So that you will get a better ranking, more installs, and stronger trust.
Let’s make your Shopify app listing into a high-converting asset!
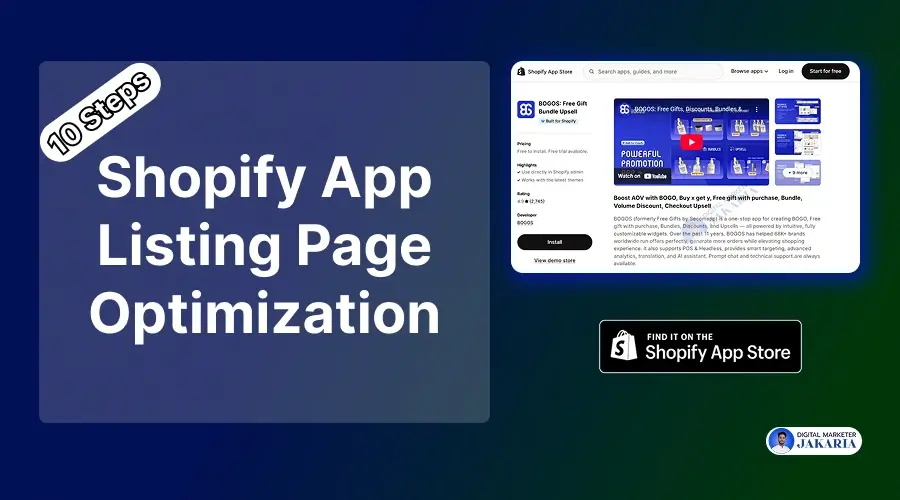
Step-by-Step Guide to Shopify App Store Optimization
This guide breaks ASO into clear, simple steps. Follow this guide to learn how to improve your keywords, listings, visuals, and conversion rates. So your Shopify app gets more visibility and installs.
Step 1: App Name and App Card Subtitle
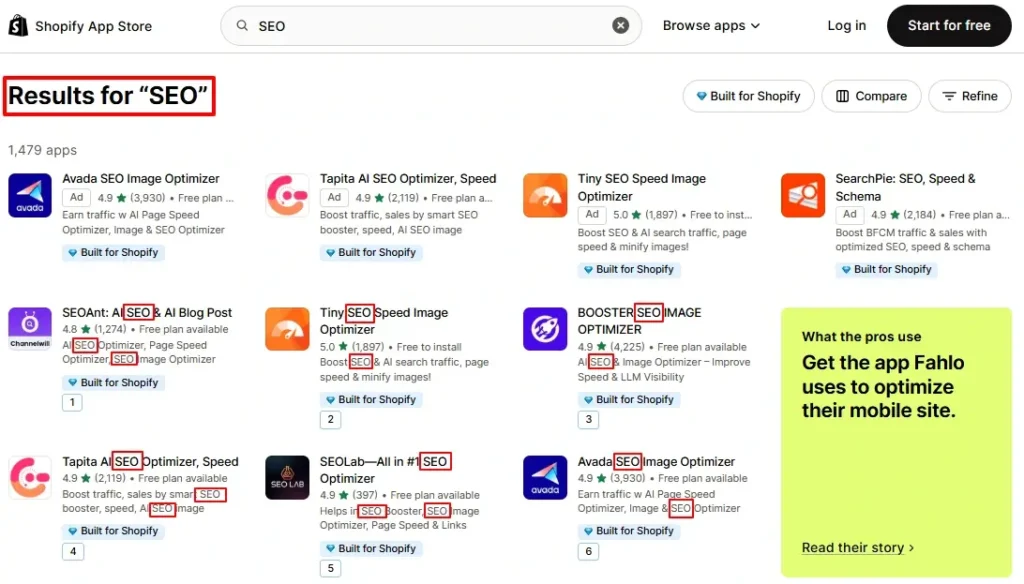
Look at the image, I have searched “SEO” on the app store, and every single app has included the word “SEO” in their app name and app card. – Why?
Because this 30-character app name and 62 characters of the app card subtitle are the first impression in front of merchants. Also, this is one of the most important ranking factors on the Shopify app store.
Anyway, you can see the short text under the app name is the ‘app card subtitle’ on the Shopify app store. If you want to improve your ranking on the app store, I would like to suggest placing your target keyword(s) on the app name and the app card subtitle.
Note: Remember to ensure you place the keyword naturally, maintaining flow, ensuring it is easy to read, and helpful for merchants.
Step 2: App Introduction and App Details (Description)
When merchants click your app, the first thing they see is your introduction under the featured image. This small section (100 characters) decides whether they scroll to explore your app or leave. That’s why this title should clearly say what your app does and who it helps.
Another one is the app details or the long description of 500 characters. Actually, this is the place where you can explain how your Shopify app will be helpful and beneficial for merchants. Shopify merchants prefer clarity over long stories. So, explain the exact problems your app solves.
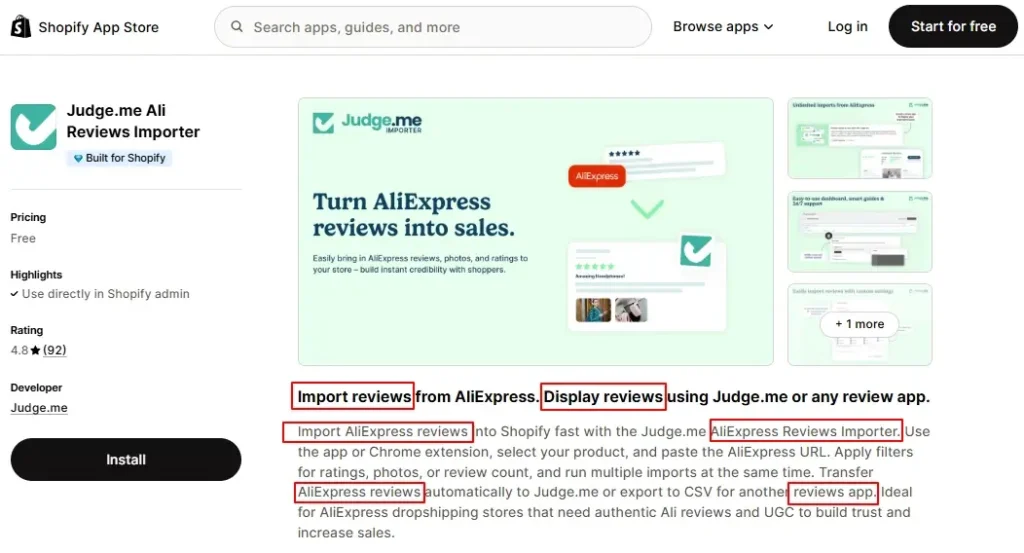
You know, Judge Me generated millions of revenue and is the most successful app in the Shopify ecosystem. Look at their listing page, they have clearly explained what this app can serve for merchants: ‘Import reviews from AliExpress‘.
You can naturally incorporate your primary and relevant keywords into the description. Don’t stuff, write for humans first. Shopify’s ranking system understands context, so natural placement works better.
Step 3: Primary & Secondary Category and Category Details
Choosing the right category is a must for a ranking boost that many developers ignore. Your primary category tells Shopify where to show your app. The secondary category expands visibility even more.
If your categories match the merchant’s search intent, you instantly get better placement. For example, an “SEO App” should never choose “Store Design” as its main category.
Also, fill in the category with the right words that Shopify offers to check. Shopify uses these sections to match merchant intent with apps. But, don’t mislead Shopify by selecting all the checkboxes if they are irrelevant to your app.
Step 4: Optimize the Feature List
The feature list is often the fastest way to win a click. Merchants scan these points before installing your app. So make each feature crystal clear and benefit-focused that solves the merchant’s problems.
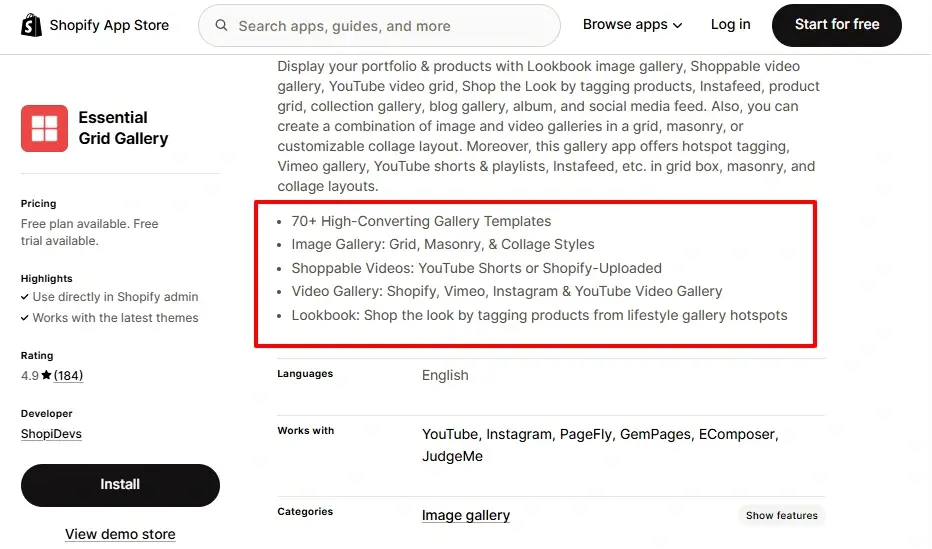
Here’s a simple structure you can follow for five features:
- Main Benefit – Short explanation of what it solves.
- Key Function – What the app does automatically.
- Workflow Improvement – How it saves time.
- Merchant Result – What outcome can they expect?
- Bonus Support – Any extra value or unique angle.
Keep every feature short, readable, and value-focused. Avoid technical jargon unless it helps to understand.
Step 5: Add 5 Keywords Most Relevant for the Shopify App Store
Shopify allows you to add up to 5 keywords for your apps to boost their search ranking. And these keywords will not be visible to the listing; this is only for boosting your app’s visibility for specific keywords.
These five keywords are one of the most powerful ranking signals on the Shopify App Store. They help Shopify understand what your app should rank for beyond your title and subtitle.
Choose keywords with high intent and low competition. Avoid repeating the same keyword used in the app name. Place only one keyword per slot and keep them all relevant. These keywords help Shopify auto-match your app with merchant search intent.
Step 6: Create a Demo Store & Add Link to Listing Page
A demo store builds instant trust. Merchants want to see how your app works in a real environment before installing.
Set up a simple demo store with a clean theme. Install your own app in the demo store, add mock data, and showcase the core features of your app. Keep everything easy to navigate, and highlight what your app does for a Shopify store.
Then, place your demo store link on the listing page.
Step 7: Add Address Details and Website Link
Shopify requires a valid business address. But beyond compliance, your address and website link add legitimacy. Merchants trust apps backed by real companies. So, use the website to reinforce your app’s value, show features, and offer support options.
If you are a solo developer, you can add your real address and a website that highlights your app’s features. It not only builds trust but also helps to rank your app on Google and other AI ChatBots like ChatGPT, Gemini, Perplexity, or LLMs.
Small details like this reduce merchant hesitation and boost your install rate.
Step 8: Visual Image and Screenshots Optimization
Visuals are often the first thing merchants see. Before reading a single line, they judge your app by its images. That’s why strong visuals can double your conversions.
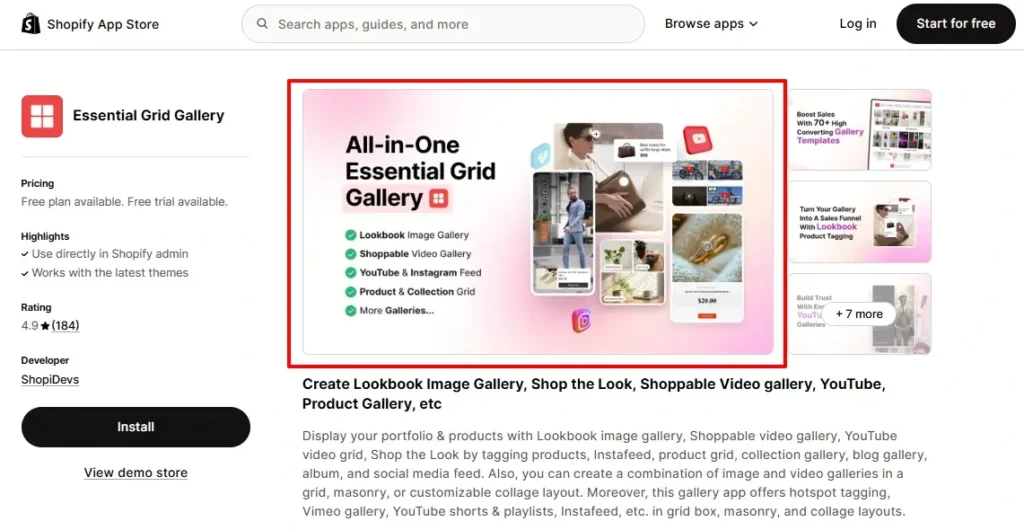
I learned this recently with the Essential Grid Gallery app. We changed only the featured image. Nothing else. Within two weeks, installs went up by 11.8 percent. Paid subscriptions almost doubled.
One simple visual tweak made this massive impact. This is how powerful visuals are on the Shopify App Store.
Featured Image
Use a clean, high-quality featured image that shows the main benefit at a glance. Keep it simple and clear. Avoid too many elements. A strong, bold visual can increase trust instantly.
Video (Optional)
Add a short 30 to 90-second video. Show the real workflow, not animations. Let merchants see how easy the app is to use. End the video with a clear benefit. Even a basic demo video can improve conversions.
Screenshots
Add three to five screenshots that tell a story. Follow this order:
Problem → Feature → Solution → Result
Use short captions under each screenshot. Explain what merchants are seeing. Simple visuals help merchants understand your app much faster.
Additional Images
Add extra visuals like integration screenshots, workflow diagrams, results, or before-and-after examples. These give merchants more clarity and confidence before installing your app.
Visual optimization is not hard. Small changes often bring big results. My experience with Essential Grid Gallery proved that even a single image update can transform your install rate. That’s why every visual asset matters. Let me know if you want me to rewrite more sections!
Step 9: Integration (Works With) and Support Details
List all the apps, tools, and Shopify features your app integrates with. This boosts search visibility for related terms and increases merchant trust. For example, you are optimizing for an image gallery app, here you can add integration like it works with Instagram, Facebook, Behance, etc…
Also, add your support email, documentation link, and support hours (if you are available 24/7). When merchants see fast support availability, they feel safe installing your app.
Step 10: Localized ASO (Optimize the Listing in Multiple Languages)
Shopify supports listing pages in multiple languages. If your app serves global merchants, localization is a major ranking advantage.
Translate the app name, subtitle, descriptions, and screenshots into key languages like French, Spanish, German, Portuguese, Japanese, and wherever your target market is.
Localized listings increase visibility, reach new markets, and help merchants feel more confident about installing your app.
Overview: Shopify App Listing Page Optimization
| Section | What to Do | Why It Matters |
| App Name & Subtitle | Add target keyword naturally in name (max 30 chars) and subtitle (max 62 chars). | This is a major ranking factor and the merchant’s first impression. |
| Introduction & Description | Write a clear 100-character introduction and a 500-character description text explaining what the app does and who it helps. | Helps merchants quickly understand value and reduces bounce rate. |
| Categories | Choose the correct primary and secondary categories. | Ensures better placement and visibility in the Shopify App Store. |
| Feature List | Add 5 benefit-focused features with short, compelling explanations. | Helps merchants see results instantly and improves conversions. |
| 5 Keywords | Add five high-intent, relevant keywords (one per slot). | A strong ranking signal for the Shopify search engine. |
| Demo Store Link | Create a demo store and add the link to the listing. | Builds trust by showing how the app looks and works in a real store environment. |
| Address & Website | Add your business address and a website with app information. | Boosts credibility and trust; it is a required field by Shopify. |
| Visual Optimization | Update featured image, high-quality screenshots, videos, and extra visuals. | The strongest conversion booster; it’s the first thing merchants visually judge. |
| Integrations & Support | List key integrations and add a support email/comprehensive documentation. | Shows app compatibility and significantly increases merchant confidence. |
| Localized ASO | Translate the listing into multiple languages relevant to your target audience. | Expands reach and improves ranking in global markets. |
Post-Publishing App Listing Optimization Tips
App Store Optimization doesn’t end after optimizing your Shopify app once. Shopify constantly reevaluates apps based on performance signals like installs, reviews, and listing engagement.
That’s why you must monitor your data weekly and continue improving your listing. Even small updates like adjusting visuals, rewriting descriptions, or refining keywords can help your app climb higher in search results over time.
Key Tips:
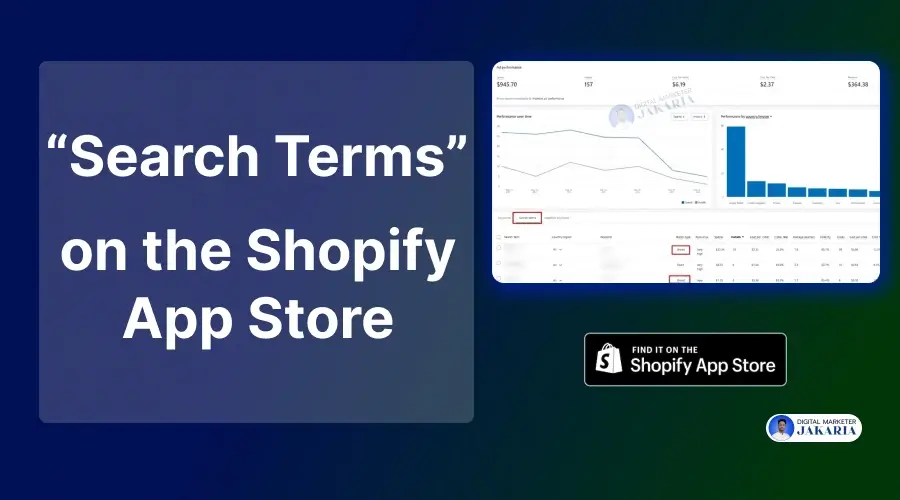
- Track installs, conversion rates, CTR, and reviews weekly to spot trends early.
- Create a Google Sheet for “Before vs. After” rankings to monitor keyword improvements.
- Shopify may adjust your ranking over time—so check your search positions once per week.
- Update descriptions, visuals, and keywords based on performance data (not assumptions).
- Refresh screenshots or featured images every 4–8 weeks to keep your listing competitive.
Conclusion
Shopify App Store Optimization isn’t always complicated or rocket science. Even a small improvement can make a significant impact, as I proved for Essential Grid Gallery. But often, app founders don’t focus on it. As a result, their apps stay invisible to Shopify merchants.
By following this 10-step guide, you will easily optimize your Shopify app listing page with the right keywords. It will improve your ranking on the App Store, help you get more clicks, and installations.
When you optimize your app name, subtitle, features, screenshots, and categories the right way, Shopify starts matching your app with more search terms. This increases installs, improves conversions, and builds long-term trust with merchants.
Now it’s your turn. Use the steps in this guide to optimize your Shopify app listing from top to bottom. Make one improvement at a time, track the results, and continue updating. With consistent ASO, your app will grow faster and attract the right merchants.
If you are still confused in any step, don’t hesitate to discuss with me for free.
FAQs
How do I optimize my Shopify app listing for better ranking?
Start by improving your app name, subtitle, and keywords. Then optimize visuals, descriptions, feature lists, and categories. Strong visuals, clear benefits, and relevant keywords help Shopify understand your app and boost ranking.
Which keywords should I use for Shopify App Store Optimization?
Choose keywords that match merchant search intent. Use them naturally in your app name, subtitle, and description. Avoid keyword stuffing. Shopify’s ranking system understands context, so high-intent and relevant keywords work best.
How often should I update my Shopify app listing?
Review your ranking, installs, and conversion rate every week. Update keywords, visuals, and descriptions when performance drops. Small, regular improvements help Shopify trust your app and increase visibility over time.
Does Shopify App SEO really improve installs?
Yes. Optimizing keywords, visuals, feature lists, and categories improves discoverability and conversion rates. Even a small visual or keyword update can significantly increase installs, especially in competitive niches like SEO, marketing, or store management apps.